


Last week I was working on the technique of making small handheld bouquets. I am hoping to transition my business to offering more workshops this year. I had been thinking about doing this before the pandemic hit but, as you can imagine, that idea had to be put on the back burner. As things are slowly changing in that regard, I want to be ready with new ideas for my business moving forward. Practice, practice, practice is always a means to that end.

I have made numerous handheld bouquets for weddings and other events but, trying to figure out a way to teach others how to do this takes time and, as I said, much practice. That is what I was doing last week.

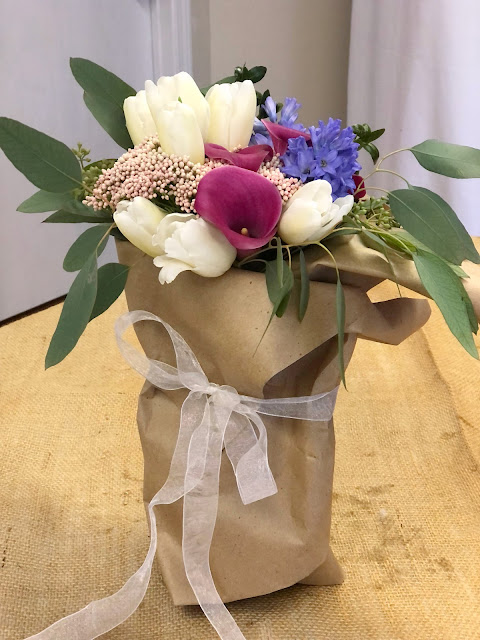
I loved this combination of these flowers: rice flower, tulips, mini callas and greenery. When the bouquet was done, I wanted to package it in a pretty display and decided on brown craft paper tied with a ribbon. It is a very easy process so, I thought I would show it to you today.

First cut a piece of paper from a roll of mailing or specialty craft paper. Roll out 24"ish. The roll width will act as the lengthwise measurement. (I apologize for the wrinkles of the paper and the tablecloth. I had a very small amount of paper that day and had folded it a time or two earlier
in the day 😏. The tablecloth wrinkles were simply from my laziness to iron it.)

Next fold the paper lengthwise in a crooked manner as seen here in the picture below.

Place the bouquet in the center of the paper. At this point, I should note that I have done one other step here that I didn't show. I usually take paper towels, 1 1/2-2, wet them with water, wrap the stems with the paper towels and place all of this in a plastic sandwich bag. I, then, winch everything up with an elastic band. It works pretty well. It keeps the flowers fresh for delivery. This is always the optimum goal.
Fold one corner of the paper to the center moving over the bouquet. The corner should be placed in a slightly downward motion.

Next, fold the other side of the paper over the fold you just made. Depending on how big your bouquet is will determine if you must bring the fold around to the back of the bouquet. This is what I had to do here. You can also fiddle around with the placement of the folds of the paper to make it look its best.

Finally, take a nice ribbon and tightly cinch and tie the ribbon around the flowers and paper.
Finish off with a bow.

Try to have the flowers pop out from the top of the paper to show off the glory of the bouquet.


Well, there you have it, a handheld bouquet wrapped and ready to be delivered to your friends and loved ones.

I quickly made more of these little bouquets for my daughters and daughter-in-law for Valentine's Day. I wrapped some of them in paper that I later purchased. That paper had pink stripes on it. I thought they looked lovely :). Unfortunately, I was in such a rush to get them delivered that I didn't have time to take a picture of them. Maybe next time. However, this is only to say that playing around with flowers and their presentation is always fun...for me anyway!
You might just like it!
We were Featured!

Joining these Link Parties:


So pretty!I will be sharing your lovely flowers at TFT today!
ReplyDeleteThanks so much, Amber! I truly appreciate the feature!
ReplyDelete